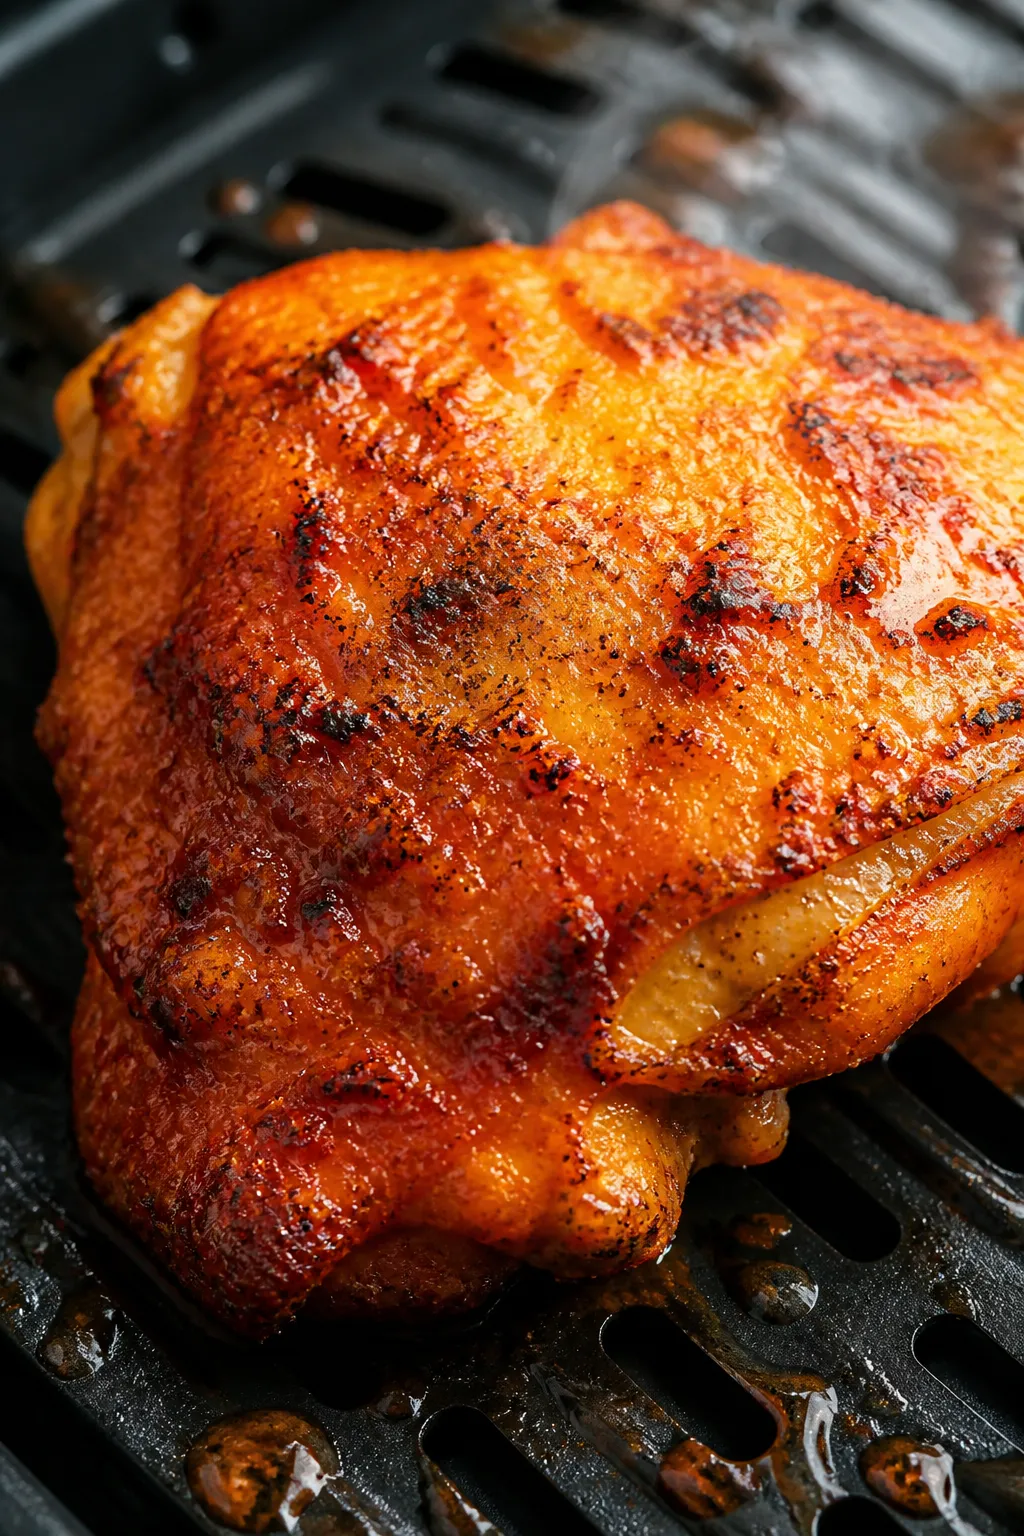
Air Fryer Buffalo Chicken Thighs – Crispy, Juicy, and Ready Fast
These air fryer buffalo chicken thighs bring restaurant-level flavor to your weeknight dinner with minimal fuss. They’re crispy on the outside, juicy inside, and coated in a buttery, tangy buffalo sauce that clings to every bite. You can make them in under 30 minutes with pantry basics.
FREE 7-Day Easy Dinner Reset
FREE 7-Day Easy Dinner Reset
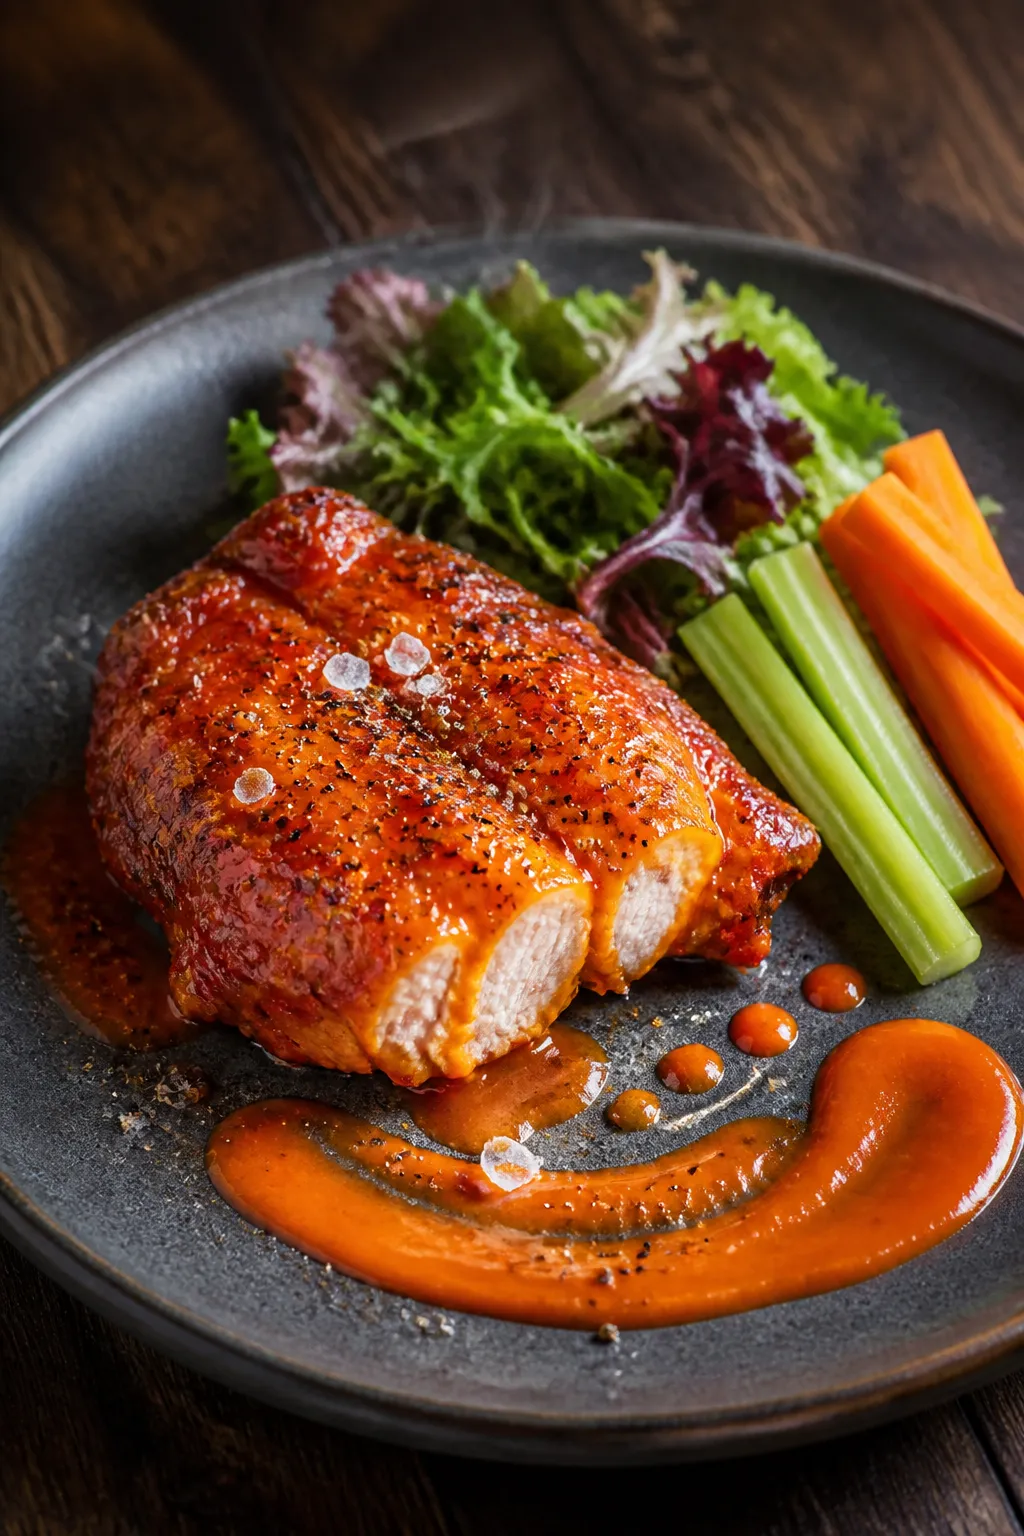
Serve them with celery, carrot sticks, and a cool dip, or pile them into a wrap or salad. If you love Buffalo wings but want something meatier and easier, this is your move.
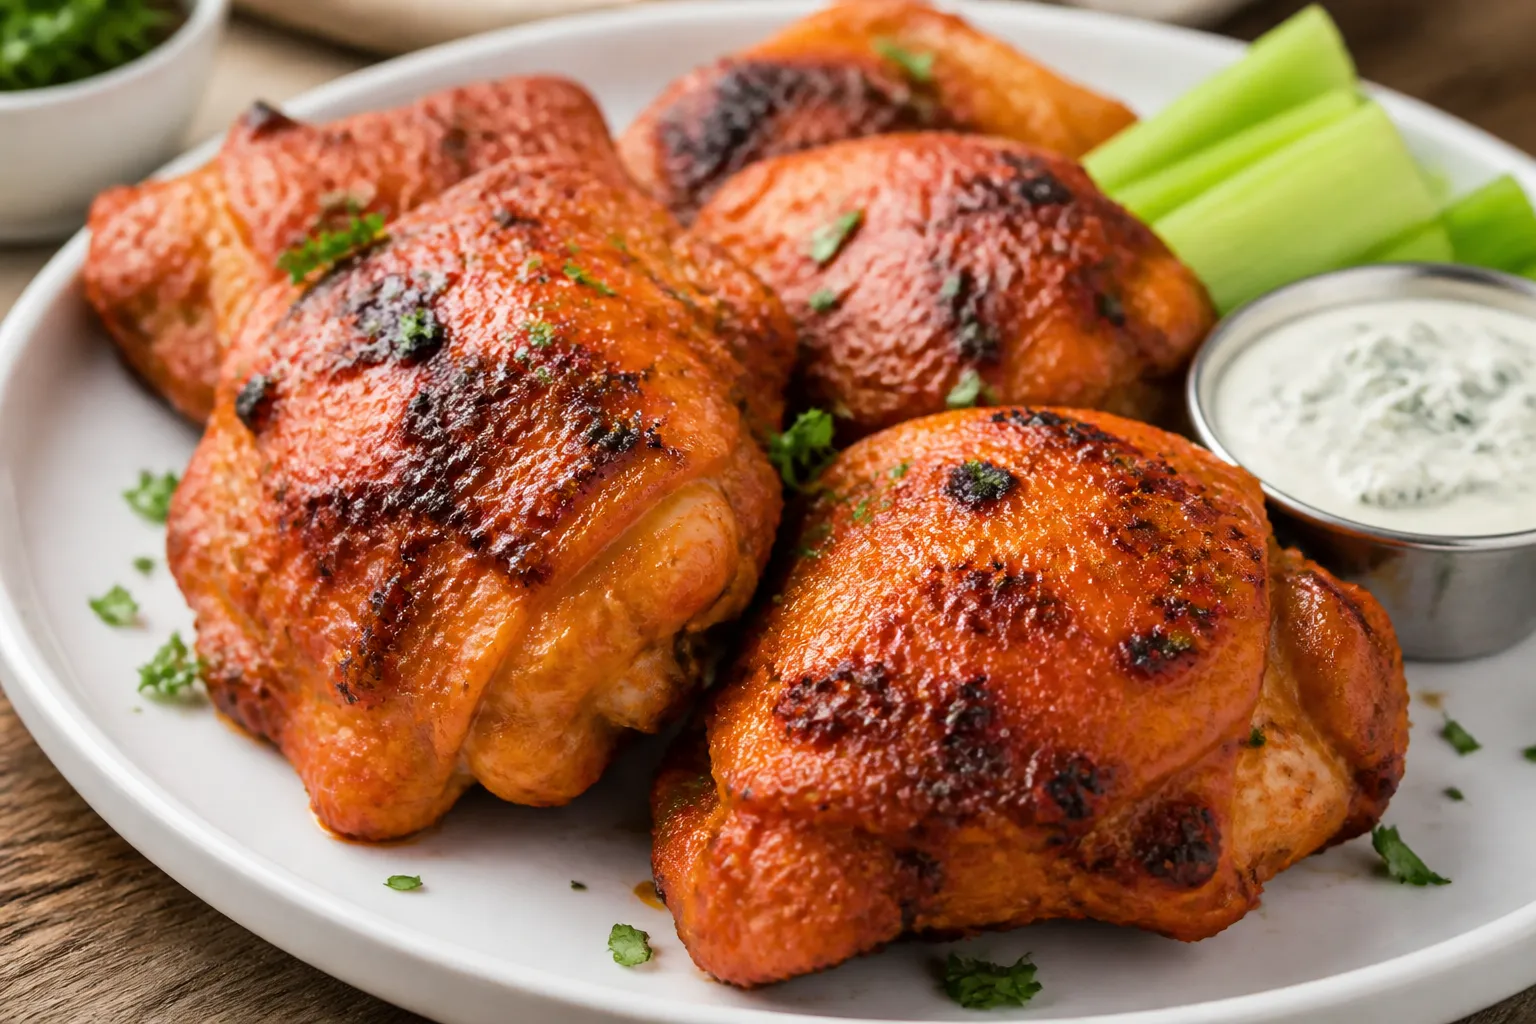
Air Fryer Buffalo Chicken Thighs - Crispy, Juicy, and Ready Fast
Ingredients
Method
- Prep the chicken: Pat the thighs dry very well with paper towels.Drier skin means crisper results. Trim any excess fat if needed.
- Season: In a small bowl, mix salt, pepper, garlic powder, onion powder, smoked paprika, and baking powder. Toss the thighs with olive oil, then sprinkle the spice mixture evenly on all sides.Press it in so it sticks.
- Preheat the air fryer: Set to 380°F (193°C) for 5 minutes. A preheated basket helps the skin crisp right away.
- Cook skin-side down first: Place thighs in a single layer, skin-side down. Air fry at 380°F for 12 minutes.
- Flip and finish: Flip skin-side up and cook another 10 to 12 minutes, or until the skin is deeply golden and an instant-read thermometer in the thickest part reads 175–185°F.Thighs are best when cooked a bit higher than 165°F; they stay juicy and tender.
- Make the buffalo sauce: While the chicken finishes, warm butter in a small saucepan over low heat. Stir in hot sauce, honey or brown sugar (if using), and apple cider vinegar. Whisk until smooth.Keep warm on low heat.
- Toss to coat: Transfer the cooked thighs to a large bowl. Pour the warm buffalo sauce over the top and toss or brush until fully coated. For extra-crispy skin, you can brush rather than drench to keep the surface texture.
- Rest and serve: Let the thighs rest 3 minutes to lock in juices.Serve with ranch or blue cheese and crunchy veggies.
What Makes This Special
This recipe hits that sweet spot of speed and satisfaction. Chicken thighs are forgiving and stay moist, even if you’re not watching the clock like a hawk.
The air fryer locks in juiciness while crisping the skin without a ton of oil. A simple spice rub builds flavor under the sauce, so each bite tastes seasoned—not just spicy on the surface. And with a small batch of homemade buffalo sauce, you can control the heat and the butteriness to your exact liking.
What You’ll Need
- Bone-in, skin-on chicken thighs (4 pieces, about 2 to 2.5 pounds)
- Olive oil (1 tablespoon)
- Kosher salt (1 to 1.5 teaspoons, to taste)
- Black pepper (1/2 teaspoon)
- Garlic powder (1 teaspoon)
- Onion powder (1/2 teaspoon)
- Smoked paprika (1/2 teaspoon)
- Baking powder (1 teaspoon; helps crisp the skin)
- Hot sauce (1/3 cup; classic Frank’s RedHot works great)
- Unsalted butter (3 tablespoons)
- Honey or brown sugar (1 to 2 teaspoons, optional for balance)
- Apple cider vinegar (1 teaspoon, optional for extra tang)
- Ranch or blue cheese dressing (for serving)
- Celery and carrot sticks (optional sides)
How to Make It

- Prep the chicken: Pat the thighs dry very well with paper towels.
Drier skin means crisper results. Trim any excess fat if needed.
- Season: In a small bowl, mix salt, pepper, garlic powder, onion powder, smoked paprika, and baking powder. Toss the thighs with olive oil, then sprinkle the spice mixture evenly on all sides.
Press it in so it sticks.
- Preheat the air fryer: Set to 380°F (193°C) for 5 minutes. A preheated basket helps the skin crisp right away.
- Cook skin-side down first: Place thighs in a single layer, skin-side down. Air fry at 380°F for 12 minutes.
- Flip and finish: Flip skin-side up and cook another 10 to 12 minutes, or until the skin is deeply golden and an instant-read thermometer in the thickest part reads 175–185°F.
Thighs are best when cooked a bit higher than 165°F; they stay juicy and tender.
- Make the buffalo sauce: While the chicken finishes, warm butter in a small saucepan over low heat. Stir in hot sauce, honey or brown sugar (if using), and apple cider vinegar. Whisk until smooth.
Keep warm on low heat.
- Toss to coat: Transfer the cooked thighs to a large bowl. Pour the warm buffalo sauce over the top and toss or brush until fully coated. For extra-crispy skin, you can brush rather than drench to keep the surface texture.
- Rest and serve: Let the thighs rest 3 minutes to lock in juices.
Serve with ranch or blue cheese and crunchy veggies.
How to Store
- Refrigerate: Cool completely, then store in an airtight container for up to 4 days.
- Freeze: Wrap individually and freeze up to 3 months. Thaw overnight in the fridge before reheating.
- Reheat: Air fryer at 350°F for 6–8 minutes until hot and re-crisped, or oven at 375°F for 10–12 minutes. Add a little extra buffalo sauce after reheating if desired.
Health Benefits
Chicken thighs provide high-quality protein that supports muscle repair and keeps you full.
Using an air fryer means you get crispy results with less added oil than pan-frying or deep-frying. Buffalo sauce brings bold flavor, which can help you enjoy a balanced plate with veggies and whole grains. If you’re watching saturated fat, you can use less butter in the sauce or swap in a little olive oil to lighten it up without losing flavor.
Pitfalls to Watch Out For
- Crowding the basket: Overlapping thighs steam instead of crisp.
Cook in batches if needed.
- Skipping the pat-dry step: Moisture is the enemy of crispy skin. Blot well before seasoning.
- Undercooking: Thighs shine at 175–185°F. At 165°F they’re safe, but not as tender.
- Over-saucing too early: Don’t sauce before cooking.
It will burn and prevent crisping.
- Uneven sizes: If your thighs are different sizes, start the larger ones a few minutes earlier or remove the smaller ones sooner.
Recipe Variations
- Boneless, skinless thighs: Cook at 380°F for 8–10 minutes per side, depending on thickness, to 175°F internal. Brush with sauce at the end.
- Extra hot: Add cayenne to the rub and a splash of your favorite extra-hot sauce to the buffalo mix.
- Garlic-parm buffalo: Stir 1–2 tablespoons grated Parmesan and an extra 1/2 teaspoon garlic powder into the sauce after removing it from heat.
- Sweet heat: Add 1 tablespoon honey to the sauce and finish with a squeeze of lime.
- Dry-rub only: Skip the sauce and increase smoked paprika and garlic powder by 1/2 teaspoon each. Serve with a side of buffalo sauce for dipping.
- Keto-friendly: Omit honey/brown sugar and serve with a low-carb ranch.
The rest of the recipe is naturally low in carbs.
- Gluten-free: This recipe is naturally gluten-free if your hot sauce is GF. Double-check labels.
FAQ
Can I use chicken breasts instead of thighs?
Stop wondering what's for dinner.
Get 7 healthy, family-friendly dinners complete with recipes and simple meal plans delivered straight to your inbox.
Yes, but adjust cook time. Use boneless, skinless breasts about 8 ounces each.
Air fry at 380°F for 8–10 minutes per side until they reach 165°F. They dry out faster than thighs, so keep an eye on the temperature and sauce right after cooking.
Do I have to use baking powder?
No, but it does help draw moisture to the surface and encourage crisping. If you skip it, make sure the skin is very dry and cook skin-side up for a few extra minutes at the end if needed.
What hot sauce works best?
Frank’s RedHot is classic for Buffalo flavor.
Crystal, Texas Pete, or Cholula also work, but they’ll change the flavor slightly. Start with less and add to taste if your sauce is spicier.
How do I prevent the sauce from getting watery?
Make sure the butter and hot sauce are fully emulsified over low heat. Toss the chicken right before serving, and let excess moisture drip off the chicken after cooking before saucing.
If needed, whisk in a teaspoon of cornstarch slurry and simmer briefly to thicken.
Can I make these ahead?
You can season the thighs a day ahead and refrigerate uncovered for extra-dry skin. Cook just before serving, then toss in sauce. Reheating works, but freshly cooked gives the best crisp.
What sides go well with buffalo chicken thighs?
Classic celery and carrots, a crisp green salad, coleslaw, roasted potatoes, or corn on the cob.
For something lighter, try cauliflower rice or a simple cucumber-tomato salad.
Is there a dairy-free option?
Yes. Replace butter with a neutral oil or a vegan butter that can emulsify. The flavor will be slightly different but still tasty.
Pair with a dairy-free ranch if needed.
My air fryer smokes—what should I do?
Place a slice of bread or a small piece of foil under the basket (not blocking airflow) to catch drips, and make sure the basket is clean of old oil. Cooking at 380°F helps reduce smoking versus higher temps.
Wrapping Up
Air fryer buffalo chicken thighs deliver big flavor with little effort. They’re crispy, tender, and perfect for busy nights or game-day platters.
Keep the seasoning simple, cook to the right temperature, and toss in a balanced buffalo sauce. Once you try them, they’ll earn a permanent spot in your dinner rotation. Don’t forget the ranch and crunchy veggies on the side.
Printable Recipe Card
Want just the essential recipe details without scrolling through the article? Get our printable recipe card with just the ingredients and instructions.
Loved This Recipe?
If you're looking for more simple, healthy dinners your family will actually eat, grab my FREE 7-Day Easy Dinner Reset. You'll get 7 easy dinner recipes, simple grocery lists, and a done-for-you plan that takes the stress out of mealtime.