Cheesy Chicken Enchilada Bake – Comforting, Crowd-Pleasing, and Easy
This cheesy chicken enchilada bake is pure comfort food without the fuss of rolling a dozen tortillas. It layers saucy chicken, soft tortillas, and plenty of melty cheese into one bubbling pan that feeds a family or a group of hungry friends. The flavors are bold but familiar—savory shredded chicken, smoky enchilada sauce, and a touch of spice balanced by creamy cheese.
FREE 7-Day Easy Dinner Reset
FREE 7-Day Easy Dinner Reset
It’s weeknight-friendly, freezer-friendly, and easy to customize with whatever you have on hand. If you love enchiladas but want a simpler path to the same cozy, satisfying bite, this bake is the way to go.
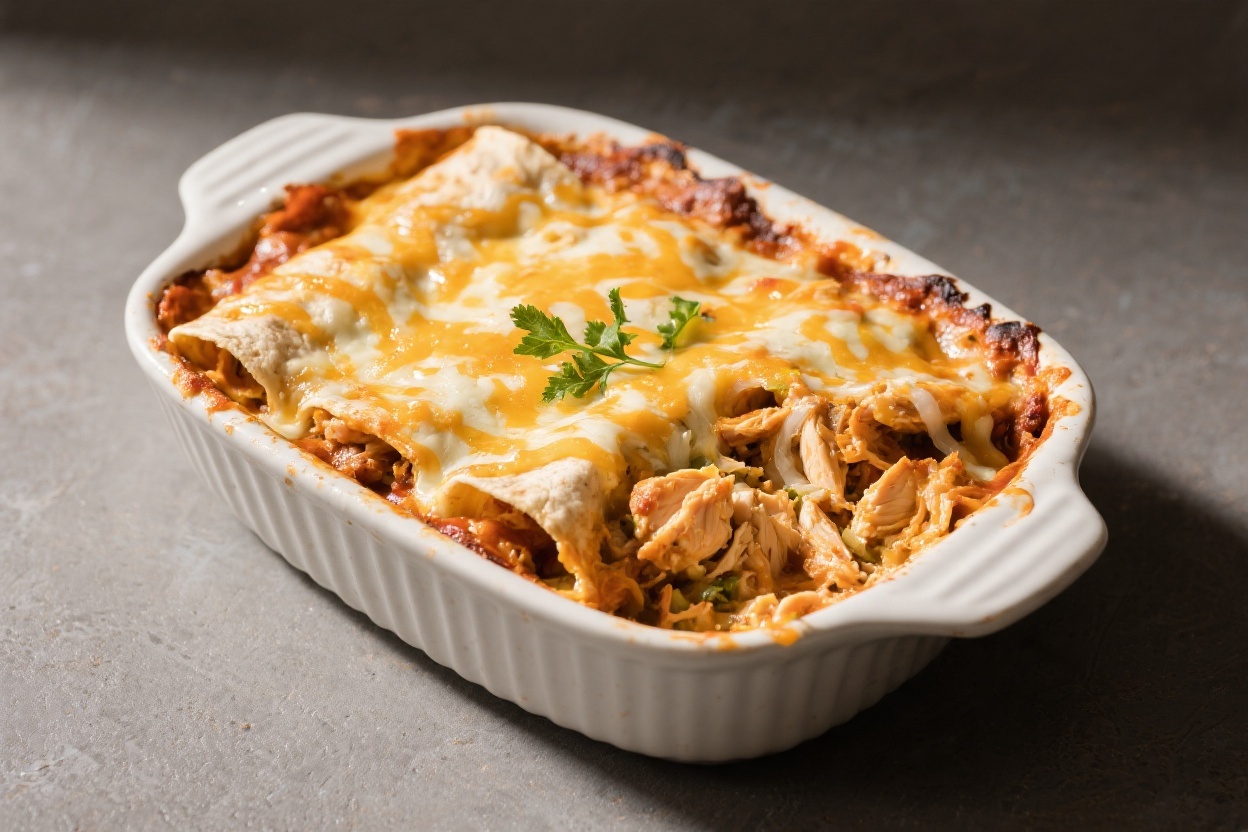
Cheesy Chicken Enchilada Bake - Comforting, Crowd-Pleasing, and Easy
Ingredients
Method
- Preheat the oven: Set your oven to 375°F (190°C). Lightly grease a 9x13-inch baking dish.
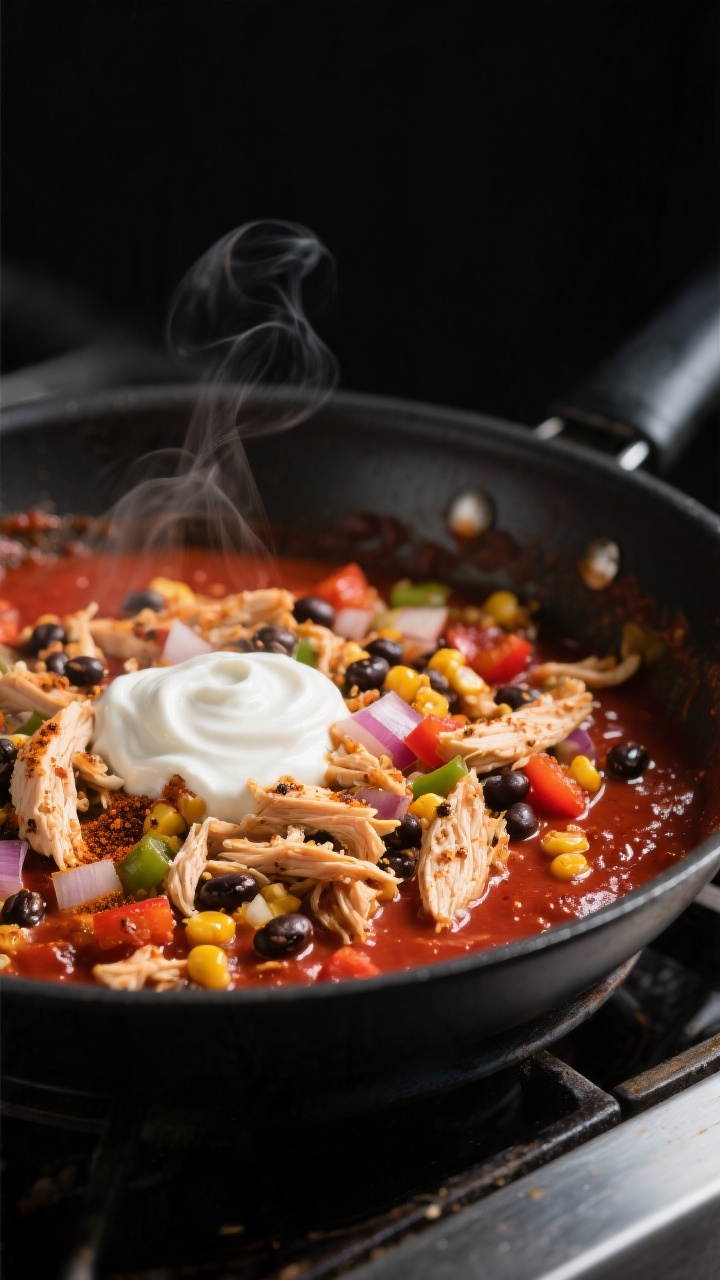
- Soften the veggies: Heat olive oil in a skillet over medium.Add onion and bell pepper. Sauté 4–5 minutes, until softened and lightly golden.
- Season the base: Stir in cumin, chili powder, smoked paprika (if using), salt, and pepper. Cook 30 seconds to bloom the spices.
- Build the filling: Add shredded chicken, black beans, and corn to the skillet.Pour in 1 cup of enchilada sauce and mix until coated. Off the heat, fold in 1/2 cup sour cream or Greek yogurt if using. Taste and adjust seasoning.
- Prep the tortillas: If using corn tortillas, warm them briefly in a dry skillet or microwave (wrapped in a damp towel) so they bend without cracking.
- Layer 1: Spread 1/3 cup enchilada sauce on the bottom of the baking dish.Arrange a layer of tortillas to cover (tear to fit if needed). Spoon half the chicken mixture over the tortillas. Sprinkle with 3/4 cup cheese.
- Layer 2: Add another layer of tortillas, the remaining chicken mixture, and another 3/4 cup cheese.
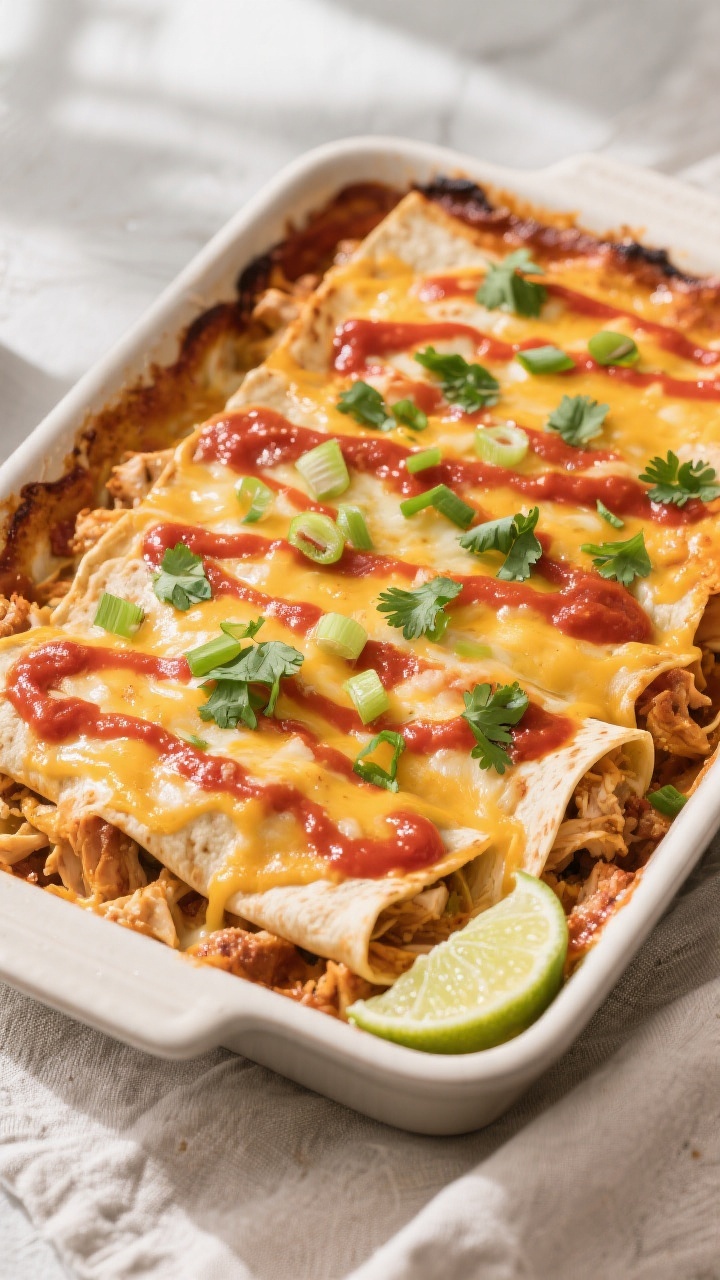
- Top layer: Finish with a final layer of tortillas, the remaining enchilada sauce, and the rest of the cheese (about 1 cup).
- Bake: Cover loosely with foil (tent it so it doesn’t stick to the cheese).Bake 20 minutes. Remove foil and bake 8–12 minutes more, until bubbly and lightly browned.
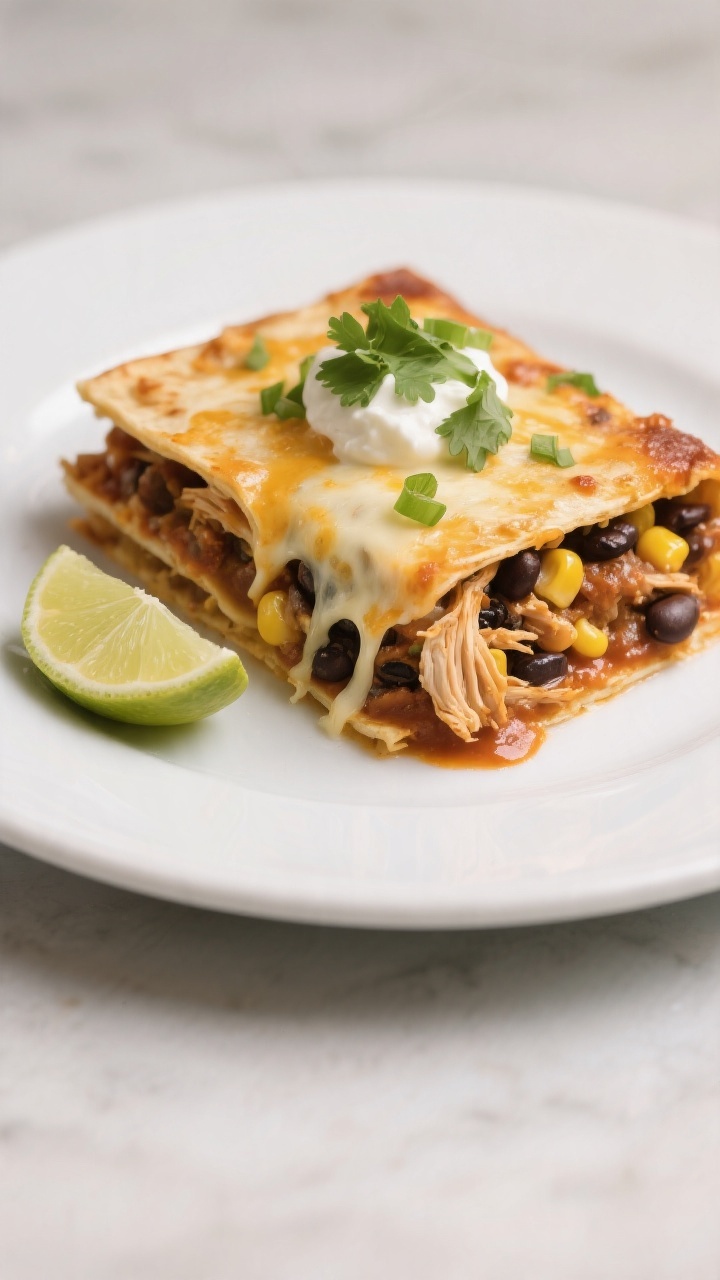
- Rest and garnish: Let it rest 10 minutes so it sets and slices cleanly. Top with chopped cilantro and green onions.
- Serve: Cut into squares.Serve with lime wedges, extra sour cream or yogurt, and your favorite hot sauce.
What Makes This Special
- All the flavor, less effort: No rolling required—just layer and bake.
- Easy to prep ahead: Assemble in the morning and bake at dinner.
- Balanced textures: Tender chicken, soft tortillas, gooey cheese, and crisp toppings.
- Great for leftovers: Reheats well for lunches and quick meals.
- Customizable: Adjust heat levels, swap proteins, or sneak in more veggies.
Ingredients
- 3 cups cooked shredded chicken (rotisserie or poached)
- 2 cups red enchilada sauce (store-bought or homemade), plus extra for drizzling
- 8–10 corn tortillas (6-inch), or 6–8 flour tortillas if preferred
- 1 cup canned black beans, drained and rinsed
- 1 cup corn kernels (frozen and thawed or canned and drained)
- 1 small yellow onion, finely diced
- 1 small bell pepper, diced (any color)
- 1–2 tablespoons olive oil
- 1 teaspoon ground cumin
- 1 teaspoon chili powder (or more to taste)
- 1/2 teaspoon smoked paprika (optional, for depth)
- 1/2 teaspoon kosher salt, plus more to taste
- 1/4 teaspoon black pepper
- 2 1/2 cups shredded cheese, divided (Mexican blend, cheddar, or Monterey Jack)
- 1/2 cup sour cream or plain Greek yogurt (stirred into the chicken mixture for creaminess; optional)
- Fresh cilantro, chopped (for garnish)
- 1–2 green onions, thinly sliced (for garnish)
- Lime wedges (for serving)
Step-by-Step Instructions
- Preheat the oven: Set your oven to 375°F (190°C). Lightly grease a 9×13-inch baking dish.
- Soften the veggies: Heat olive oil in a skillet over medium.
Add onion and bell pepper. Sauté 4–5 minutes, until softened and lightly golden.
- Season the base: Stir in cumin, chili powder, smoked paprika (if using), salt, and pepper. Cook 30 seconds to bloom the spices.
- Build the filling: Add shredded chicken, black beans, and corn to the skillet.
Pour in 1 cup of enchilada sauce and mix until coated. Off the heat, fold in 1/2 cup sour cream or Greek yogurt if using. Taste and adjust seasoning.
- Prep the tortillas: If using corn tortillas, warm them briefly in a dry skillet or microwave (wrapped in a damp towel) so they bend without cracking.
- Layer 1: Spread 1/3 cup enchilada sauce on the bottom of the baking dish.
Arrange a layer of tortillas to cover (tear to fit if needed). Spoon half the chicken mixture over the tortillas. Sprinkle with 3/4 cup cheese.
- Layer 2: Add another layer of tortillas, the remaining chicken mixture, and another 3/4 cup cheese.
- Top layer: Finish with a final layer of tortillas, the remaining enchilada sauce, and the rest of the cheese (about 1 cup).
- Bake: Cover loosely with foil (tent it so it doesn’t stick to the cheese).
Bake 20 minutes. Remove foil and bake 8–12 minutes more, until bubbly and lightly browned.
- Rest and garnish: Let it rest 10 minutes so it sets and slices cleanly. Top with chopped cilantro and green onions.
- Serve: Cut into squares.
Serve with lime wedges, extra sour cream or yogurt, and your favorite hot sauce.
How to Store
- Refrigerator: Cool completely. Cover the dish or transfer slices to airtight containers. Store up to 4 days.
- Freezer: Wrap tightly in plastic, then foil, or store portions in freezer-safe containers.
Freeze up to 2 months. Thaw overnight in the fridge for best texture.
- Reheat: Oven: 350°F (175°C) for 15–20 minutes, covered, until warmed through. Microwave: 1–3 minutes per slice, in 30-second bursts.
Add a splash of broth or sauce if it looks dry.
Health Benefits
- High-quality protein: Chicken helps keep you full and supports muscle repair.
- Fiber boost: Black beans and corn add fiber for better digestion and steady energy.
- Calcium and vitamin D (if fortified): Cheese contributes to bone health—use part-skim for a lighter option.
- Micronutrients: Bell peppers and onions bring vitamin C, antioxidants, and subtle natural sweetness.
- Flexible for balance: Pair with a crisp salad or roasted veggies to round out the meal with more produce.
Pitfalls to Watch Out For
- Soggy layers: Too much sauce can make the bake mushy. Aim for light, even coverage between layers, and reserve more for the top.
- Dry chicken: If your chicken is on the dry side, stir in a few tablespoons of broth or a bit more sauce before assembling.
- Bland sauce: Enchilada sauces vary widely. Taste and adjust with salt, lime juice, or a pinch of sugar to balance acidity.
- Overbrowning cheese: Tent with foil for most of the bake, then uncover to finish so the cheese melts without burning.
- Cracking tortillas: Warm corn tortillas so they stay pliable and layer neatly.
Variations You Can Try
- Green enchilada bake: Use salsa verde or green enchilada sauce, pepper jack cheese, and add chopped roasted poblanos.
- Spicy chipotle: Stir 1–2 teaspoons of minced chipotle in adobo into the sauce for smoky heat.
- Veggie-forward: Swap chicken for sautéed zucchini, mushrooms, and spinach.
Add extra beans for protein.
- Creamy white version: Mix a light béchamel or queso-style sauce with the chicken, and use Monterey Jack on top.
- Low-carb twist: Layer with low-carb tortillas or thin slices of roasted zucchini in place of some tortillas.
- Breakfast bake: Add softly scrambled eggs with chorizo or turkey sausage, and use a mix of cheddar and jack.
- Extra crunch: Sprinkle crushed tortilla chips on top during the last 5 minutes of baking.
FAQ
Can I make this ahead of time?
Stop wondering what's for dinner.
Get 7 healthy, family-friendly dinners complete with recipes and simple meal plans delivered straight to your inbox.
Yes. Assemble the bake up to 24 hours in advance, cover tightly, and refrigerate. Bake straight from the fridge, adding 5–10 extra minutes, or let it sit at room temperature for 20 minutes before baking.
What’s the best chicken to use?
Rotisserie chicken is fast and flavorful.
Otherwise, poach boneless skinless chicken breasts or thighs in salted water with a bay leaf, then shred. Thighs stay especially tender.
Corn or flour tortillas?
Corn tortillas offer classic flavor and hold up well in layers. Flour tortillas are softer and slightly richer.
Both work—choose your favorite or use what you have.
How can I make it spicier?
Add diced jalapeños to the filling, use hot enchilada sauce, or mix in chipotle in adobo. A few shakes of your favorite hot sauce on the plate also does the trick.
Can I use pre-shredded cheese?
Yes, it’s convenient. For the best melt and stretch, freshly grate a block of cheese, but pre-shredded works perfectly fine in a busy kitchen.
Is there a dairy-free option?
Use a dairy-free cheese that melts well and replace sour cream with a dairy-free yogurt.
Check your enchilada sauce label to confirm it’s dairy-free.
How do I keep leftovers from drying out?
Store with a little extra sauce spooned over the top and cover tightly. When reheating, add a splash of broth or water and cover to trap steam.
Can I halve the recipe?
Absolutely. Assemble in an 8×8-inch pan and reduce bake time by 5–10 minutes, checking for bubbly edges and melted cheese.
Wrapping Up
Cheesy chicken enchilada bake delivers all the comfort and flavor of classic enchiladas with a fraction of the work.
It’s a reliable, family-friendly dish you can customize to suit your tastes, your pantry, and your schedule. Whether it’s a weeknight dinner or your go-to potluck star, this layered, saucy, cheesy favorite never disappoints. Keep a pan in your rotation, and you’ll always have a warm, satisfying meal just a few steps away.
Printable Recipe Card
Want just the essential recipe details without scrolling through the article? Get our printable recipe card with just the ingredients and instructions.
Loved This Recipe?
If you're looking for more simple, healthy dinners your family will actually eat, grab my FREE 7-Day Easy Dinner Reset. You'll get 7 easy dinner recipes, simple grocery lists, and a done-for-you plan that takes the stress out of mealtime.