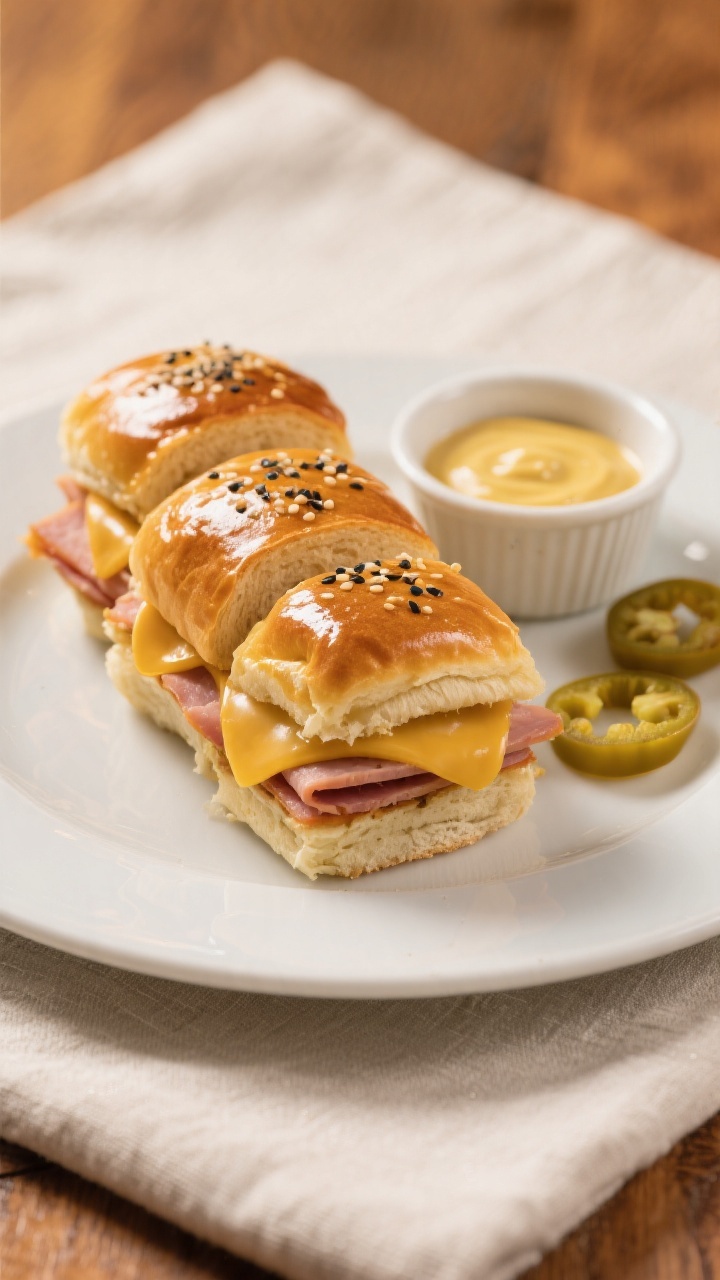
Hawaiian Roll Sliders – Easy, Crowd-Pleasing Party Bites
These sliders are the kind of recipe you keep in your back pocket for busy nights, game days, or when friends drop by. Soft, slightly sweet Hawaiian rolls get filled with savory meats and gooey cheese, then baked until everything melts together. They’re simple to assemble, easy to customize, and disappear fast.
FREE 7-Day Easy Dinner Reset
FREE 7-Day Easy Dinner Reset
You can prep them ahead, bake them in one pan, and feed a crowd without breaking a sweat.
Hawaiian Roll Sliders - Easy, Crowd-Pleasing Party Bites
Ingredients
Method
- Preheat your oven to 350°F (175°C). Lightly grease a 9x13-inch baking dish with nonstick spray or butter to keep the sliders from sticking.
- Slice the rolls as a slab. Without separating the rolls, run a serrated knife horizontally through the middle to create a top and bottom layer. Place the bottom half in your baking dish.
- Layer the cheese first. Add a single layer of cheese over the bottom rolls, all the way to the edges.This creates a barrier so the rolls don’t get soggy from the meat or toppings.
- Add the deli meat. Fold or shingle the ham (and turkey, if using) in even layers. Don’t pack it too high, but make sure there’s meat in every bite.
- Top with more cheese. Add another light layer of cheese for extra melt and stability.
- Add extras, if you like. A few thin pickle slices, caramelized onions, or banana peppers add great texture and flavor. Keep layers thin so the sliders press together well.
- Place the top slab of rolls over the filling and gently press to help everything settle.
- Make the butter topping. In a small bowl, whisk the melted butter, Dijon, Worcestershire, honey (if using), poppy seeds, garlic powder, onion powder, salt, and pepper until smooth.
- Brush the tops generously. Use a pastry brush or spoon to coat the rolls with the butter mixture.Let a little drip down the sides so it flavors the edges too.
- Tent with foil (not tight—leave a bit of space so it doesn’t stick to the tops) and bake for 12–15 minutes until the cheese is melted.
- Uncover and finish baking for another 5–7 minutes, until the tops are golden and slightly crisp.
- Rest briefly, then slice. Let the sliders sit for 3–5 minutes so the cheese sets slightly. Slice along the roll lines with a serrated knife and serve warm.
What Makes This Special
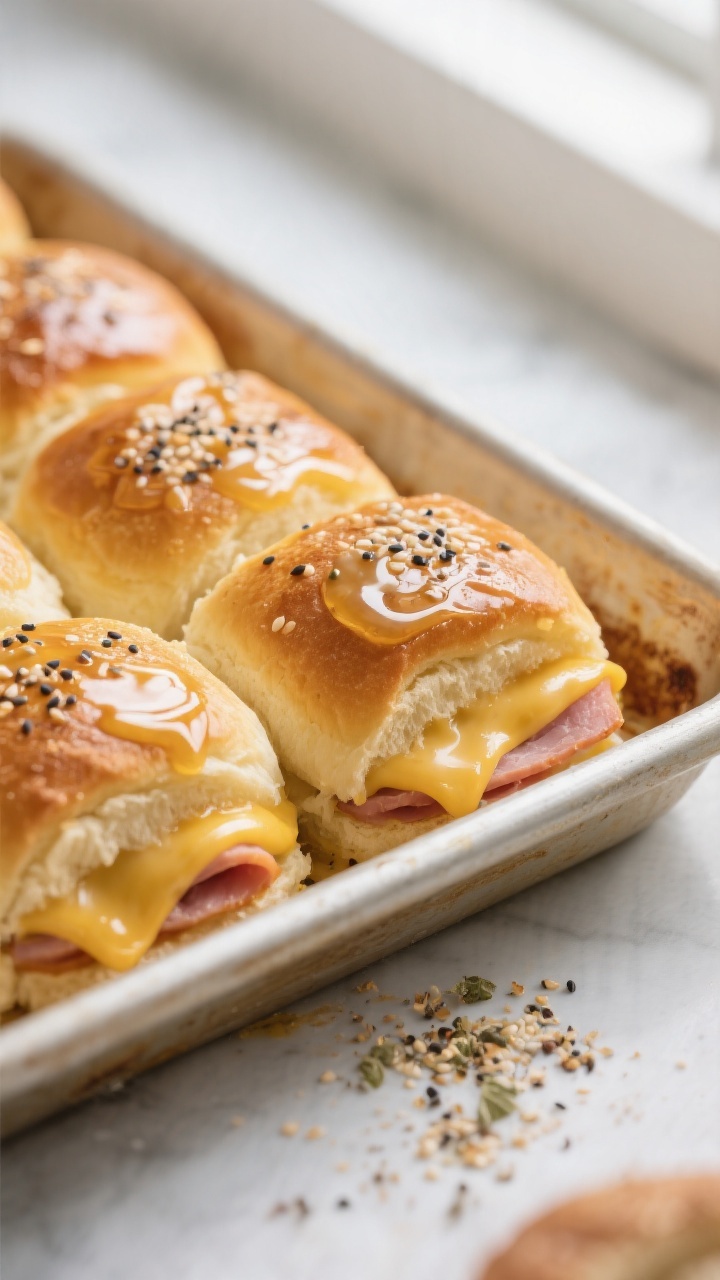
Hawaiian roll sliders hit that sweet-savory balance people love. The rolls toast up buttery at the edges and stay soft inside, so every bite tastes like a deli sandwich made in a bakery. You also get a flavorful, tangy butter topping that soaks into the rolls and adds a little crunch on top.
Best of all, you can mix and match ingredients to match your cravings or what you’ve got on hand.
Ingredients
- 1 package (12-count) Hawaiian sweet rolls (King’s Hawaiian or similar)
- 12–16 slices deli ham (thinly sliced; you can also mix ham and turkey)
- 8–10 slices Swiss cheese (or provolone, mozzarella, or cheddar)
- 1/3 cup unsalted butter, melted
- 1 tablespoon Dijon mustard
- 2 teaspoons Worcestershire sauce
- 1 teaspoon honey (optional, for extra sweetness)
- 1 teaspoon poppy seeds (optional, for crunch)
- 1/2 teaspoon garlic powder
- 1/2 teaspoon onion powder
- Pinch of kosher salt and black pepper
- Nonstick spray or a little extra butter for greasing the pan
- Optional add-ins: thinly sliced pickles, caramelized onions, banana peppers, or a few teaspoons of everything bagel seasoning for the topping
Step-by-Step Instructions

- Preheat your oven to 350°F (175°C). Lightly grease a 9×13-inch baking dish with nonstick spray or butter to keep the sliders from sticking.
- Slice the rolls as a slab. Without separating the rolls, run a serrated knife horizontally through the middle to create a top and bottom layer. Place the bottom half in your baking dish.
- Layer the cheese first. Add a single layer of cheese over the bottom rolls, all the way to the edges.
This creates a barrier so the rolls don’t get soggy from the meat or toppings.
- Add the deli meat. Fold or shingle the ham (and turkey, if using) in even layers. Don’t pack it too high, but make sure there’s meat in every bite.
- Top with more cheese. Add another light layer of cheese for extra melt and stability.
- Add extras, if you like. A few thin pickle slices, caramelized onions, or banana peppers add great texture and flavor. Keep layers thin so the sliders press together well.
- Place the top slab of rolls over the filling and gently press to help everything settle.
- Make the butter topping. In a small bowl, whisk the melted butter, Dijon, Worcestershire, honey (if using), poppy seeds, garlic powder, onion powder, salt, and pepper until smooth.
- Brush the tops generously. Use a pastry brush or spoon to coat the rolls with the butter mixture.
Let a little drip down the sides so it flavors the edges too.
- Tent with foil (not tight—leave a bit of space so it doesn’t stick to the tops) and bake for 12–15 minutes until the cheese is melted.
- Uncover and finish baking for another 5–7 minutes, until the tops are golden and slightly crisp.
- Rest briefly, then slice. Let the sliders sit for 3–5 minutes so the cheese sets slightly. Slice along the roll lines with a serrated knife and serve warm.
Keeping It Fresh
These sliders taste best right out of the oven, but you can keep leftovers. Store cooled sliders in an airtight container in the fridge for up to 3 days.
Reheat in a 300°F (150°C) oven for 8–10 minutes, covered, then uncover for 2–3 minutes to crisp the tops. For make-ahead, assemble the sliders and refrigerate, tightly covered, for up to 24 hours, then bake just before serving.
Why This is Good for You
- Balance of protein and carbs: The deli meat and cheese provide protein to keep you satisfied, while the rolls offer quick energy.
- Portion control built-in: Sliders are naturally small, so it’s easy to count servings and adjust to your appetite.
- Customizable ingredients: You can use lower-sodium deli meat, reduced-fat cheese, or add veggies like spinach and tomatoes to boost nutrients.
- Less waste: Everything bakes in one pan, and leftovers reheat well, so you’re more likely to enjoy every last piece.
What Not to Do
- Don’t separate the rolls before slicing horizontally. Keeping them as a slab makes assembly and slicing far easier.
- Don’t skip the cheese-on-the-bottom layer. It prevents sogginess and keeps the rolls from soaking up too much moisture.
- Don’t pile on too many wet toppings. A few pickles or onions are great; too much and your sliders will slide apart.
- Don’t overbake. If you dry out the rolls, you lose that signature soft, pull-apart texture.
- Don’t use cold butter for the topping. It won’t spread evenly. Melted butter ensures every roll gets flavor.
Recipe Variations
- Turkey Cranberry: Turkey, provolone, a thin swipe of cranberry sauce, and a sprinkle of chopped rosemary.
Swap Dijon for whole-grain mustard.
- Italian Deli: Pepperoni, salami, and provolone with a drizzle of Italian dressing and a few banana peppers. Top with Italian seasoning instead of poppy seeds.
- BBQ Chicken: Shredded rotisserie chicken mixed with barbecue sauce, red onion slivers, and cheddar. Brush tops with butter plus a little BBQ sauce.
- Breakfast Sliders: Soft scrambled eggs, crumbled cooked bacon or sausage, and American or cheddar cheese.
Add a maple-butter glaze for a sweet finish.
- Veggie Caprese: Fresh mozzarella, sliced tomato (patted dry), basil leaves, and a light balsamic glaze. Use garlic-herb butter on top.
- Spicy Cuban-Style: Ham, roast pork, Swiss, thin pickles, and yellow mustard. Add a pinch of cayenne to the butter topping.
FAQ
Stop wondering what's for dinner.
Get 7 healthy, family-friendly dinners complete with recipes and simple meal plans delivered straight to your inbox.
Can I make these ahead of time?
Yes.
Assemble the sliders, cover tightly, and refrigerate for up to 24 hours. Brush with the butter mixture right before baking if you want maximum crispness on top, or brush before chilling for deeper flavor.
What’s the best cheese to use?
Swiss is classic because it melts smoothly and pairs well with ham. Provolone, mozzarella, cheddar, and Monterey Jack all work.
Choose a meltable cheese and avoid overly aged, crumbly varieties.
How do I keep the bottoms from getting soggy?
Start with a cheese layer on the bottom, don’t overload wet toppings, and bake uncovered for the last few minutes to dry and crisp the tops. If using juicy add-ins, pat them dry first.
Can I freeze Hawaiian roll sliders?
You can freeze assembled, unbaked sliders. Wrap tightly in foil and place in a freezer bag for up to 2 months.
Bake from frozen at 325°F (165°C), covered, for 20–25 minutes, then uncover and bake until heated through and golden.
What if I don’t have poppy seeds?
Leave them out or use sesame seeds, everything bagel seasoning, or a pinch of dried minced onion for texture and flavor. The sliders will still be great without them.
How many sliders should I plan per person?
For a party with other snacks, plan on 1–2 per person. For a main meal, 2–3 per person is a safe bet, especially if you’re feeding hungry teens or game-day crowds.
Can I make them gluten-free?
Yes.
Use gluten-free sweet rolls and check labels on deli meat, cheese, mustard, and Worcestershire sauce to ensure they’re gluten-free. Bake times remain the same.
How can I add more veggies?
Layer in thin spinach leaves, roasted red peppers, or sautéed mushrooms. Keep the layers light and pat veggies dry so the sliders hold together.
Final Thoughts
Hawaiian roll sliders are the definition of low effort, high reward.
They’re flexible, family-friendly, and perfect when you need something warm and satisfying without a lot of fuss. Once you nail the basic method, you can riff endlessly with different meats, cheeses, and toppings. Keep a pack of rolls in the pantry, and you’re never far from an easy win at dinner or your next get-together.
Printable Recipe Card
Want just the essential recipe details without scrolling through the article? Get our printable recipe card with just the ingredients and instructions.
Loved This Recipe?
If you're looking for more simple, healthy dinners your family will actually eat, grab my FREE 7-Day Easy Dinner Reset. You'll get 7 easy dinner recipes, simple grocery lists, and a done-for-you plan that takes the stress out of mealtime.